Is growing marigolds in water actually possible?
Yes, you can Yes, you can grow marigolds in water, but with an important distinction worth knowing upfront. Marigolds are soil plants at heart, so you cannot just drop seeds into a glass of water and expect them to thrive long-term. What actually works well is water-rooting marigold cuttings, where you take a stem cutting from an established plant, place it in water, and let it develop roots before moving it to soil or a hydroponic setup. That method is reliable, beginner-friendly, and genuinely useful., but with an important distinction worth knowing upfront. Marigolds are soil plants at heart, so you cannot just drop seeds into a glass of water and expect them to thrive long-term. What actually works well is water-rooting marigold cuttings, where you take a stem cutting from an established plant, place it in water, and let it develop roots before moving it to soil or a hydroponic setup. That method is reliable, beginner-friendly, and genuinely useful. A second option, keeping a rooted marigold growing hydroponically in a nutrient solution, is possible and practiced commercially, but it requires more attention to pH, nutrients, and oxygenation. This guide covers both approaches so you can choose whichever matches your situation today.
French marigolds (Tagetes patula) and African marigolds (Tagetes erecta) are the two main types you will encounter. French marigolds are smaller, bushier, and generally easier to handle for water-rooting at home because their stems are more compact and root readily. African marigolds are larger with thicker stems and bigger blooms, and while they root in water too, they can be a bit more demanding. For a first attempt, start with French marigolds. Single-flowered varieties tend to root faster than densely double-flowered ones, though any healthy cutting from either type will work.
Best method: seeds vs water-rooted cuttings (what works)
Marigold seeds need soil or a moist growing medium to germinate. They absorb water through their seed coat, develop a radicle (root tip), and push a shoot upward, but they cannot do this successfully in a container of standing water. Seeds left sitting in water will swell, turn soft, and rot before anything useful happens. So if you are starting from seed and want to grow in water eventually, you will need to germinate in a growing medium first and then transition. [how to grow marigolds without seeds](/article/how-to-grow-marigolds-without-seeds)
Water-rooted cuttings, on the other hand, are a genuinely practical method. You take a 4 to 6 inch cutting from a healthy marigold stem, strip the lower leaves, place the bare stem in clean water, and wait for roots to develop. This takes about 1 to 3 weeks depending on temperature and light. Once roots are 1 to 2 inches long and well-formed, you can transplant to potting mix or move into a hydroponic nutrient solution to continue growing. This is the method to focus on if you want results today.
| Method | Works in water? | Skill level | Time to roots/germination | Best for |
|---|
| Seed in water | No, seeds rot | N/A | N/A | Do not use this method |
| Cuttings in plain water | Yes, works well | Beginner | 1 to 3 weeks | Quick propagation at home |
| Hydroponic nutrient solution (rooted plant) | Yes, with management | Intermediate | Ongoing after rooting | Long-term water growing |
The recommendation: start with a water-rooted cutting, then decide whether to transplant to soil or continue in a hydroponic setup. Most home gardeners will get better results and fewer headaches by rooting in water and then moving to soil. Hydroponics is rewarding but requires pH and nutrient monitoring to avoid problems.
Supplies and setup: container, water, light, temperature
You do not need much to get started. The key is keeping things clean and giving the cutting the right environment so it can focus energy on rooting rather than surviving stress.
Container
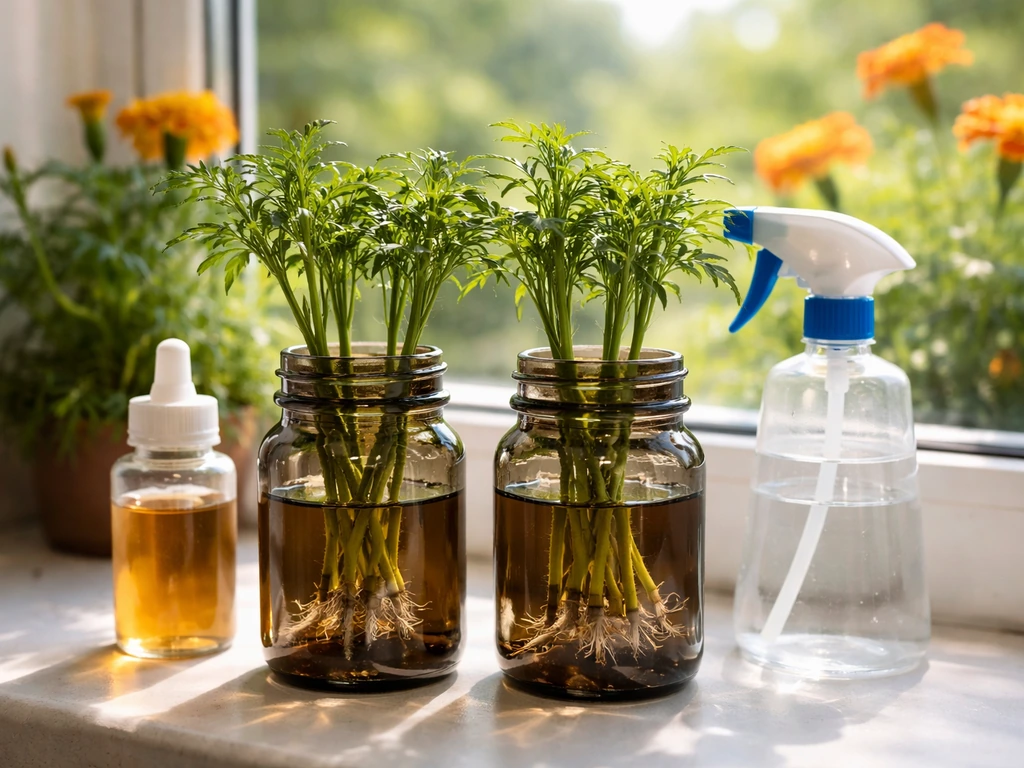
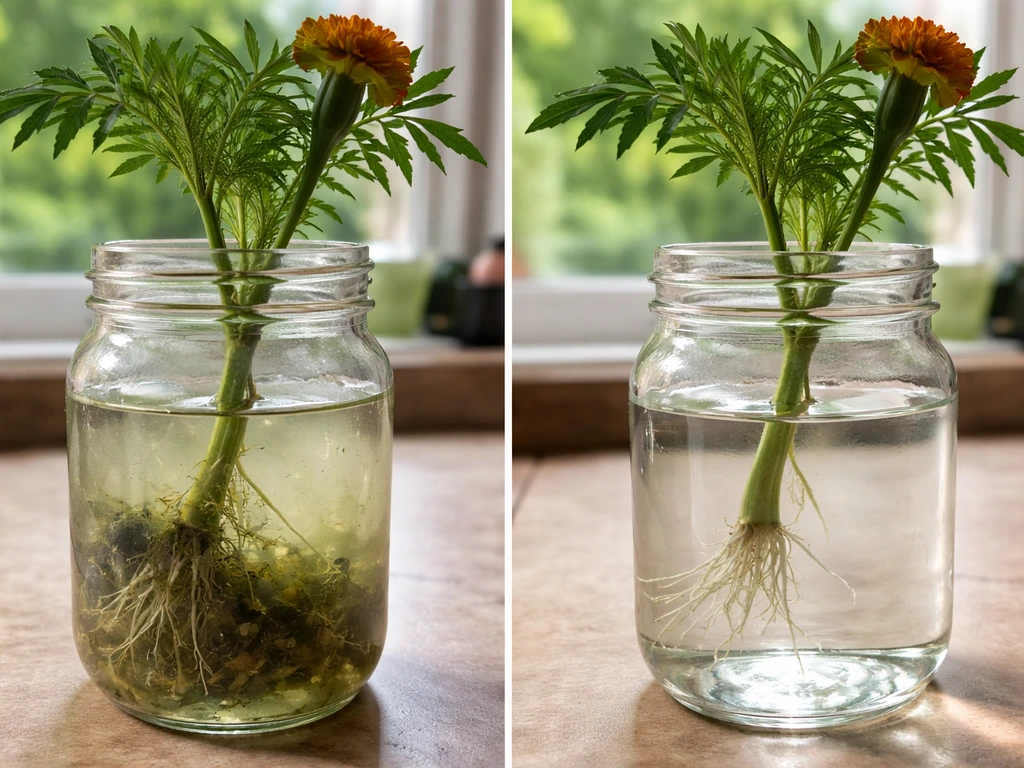
Use a small, narrow-mouthed jar or glass that holds the cutting upright without letting it flop sideways. Dark or opaque containers are better than clear glass because they reduce light penetration to the water, which slows algae growth. If all you have is a clear jar, that is fine for rooting, just wrap it loosely in foil or paper once roots start forming. Make sure the container is clean. Wash it with hot soapy water and rinse thoroughly before use. Any residue or old bacterial film can introduce pathogens that cause rot.
Water
Use room-temperature water. Tap water is fine for the rooting stage, but if your tap water is heavily chlorinated, let it sit in an open container for a few hours first to let the chlorine off-gas. Filtered or rainwater also works well. The single most important thing you can do with water during rooting is change it regularly, roughly every 5 to 7 days, and top it up between changes if the level drops. Fresh water carries dissolved oxygen, and oxygen at the stem base is what prevents rot and encourages root growth. Stagnant water depletes oxygen quickly, creates anaerobic conditions, and sets up the cutting for stem rot.
Light
Marigolds need good light, but cuttings that have not yet rooted are stressed and do not want intense direct midday sun. Place them in bright indirect light or a spot that gets morning sun and afternoon shade. A windowsill with east or north-facing light is ideal during rooting. Once roots form and you transplant or move to a hydroponic setup, shift the plant to a full-sun position, at least 6 hours of direct light per day. Indoors, a grow light set to 14 to 16 hours works well for vegetative growth. Note that African marigolds (Tagetes erecta) are short-day plants that need shorter day lengths to trigger flowering, so if you are growing under artificial light and want blooms, you will eventually need to shorten the photoperiod.
Temperature
Marigold cuttings root best when air temperature is warm, around 65 to 75 degrees Fahrenheit (18 to 24 degrees Celsius). Rooting is faster with a bit of bottom warmth, so placing the container on top of a warm surface (like a seedling heat mat set to the low end, or on top of a refrigerator) can speed things up noticeably. Avoid cold windowsills in spring or cool rooms, as low temperatures slow root formation significantly and increase rot risk. Too-high air temperatures, above 85 degrees Fahrenheit, can stress unrooted cuttings before roots form, so keep things moderate.
Step-by-step: rooting marigold cuttings in water

- Choose a healthy donor plant. Look for a marigold that is actively growing, pest-free, and not under drought stress. Avoid stems that are flowering or about to flower; you want vegetative growth for the best rooting response. If you are starting from scratch, a nursery transplant or a friend's garden plant works well.
- Take a 4 to 6 inch cutting. Use a clean, sharp pair of scissors or a blade. Cut just below a node (the point on the stem where leaves attach). A clean cut at the node gives the cutting the best chance of forming roots at that point.
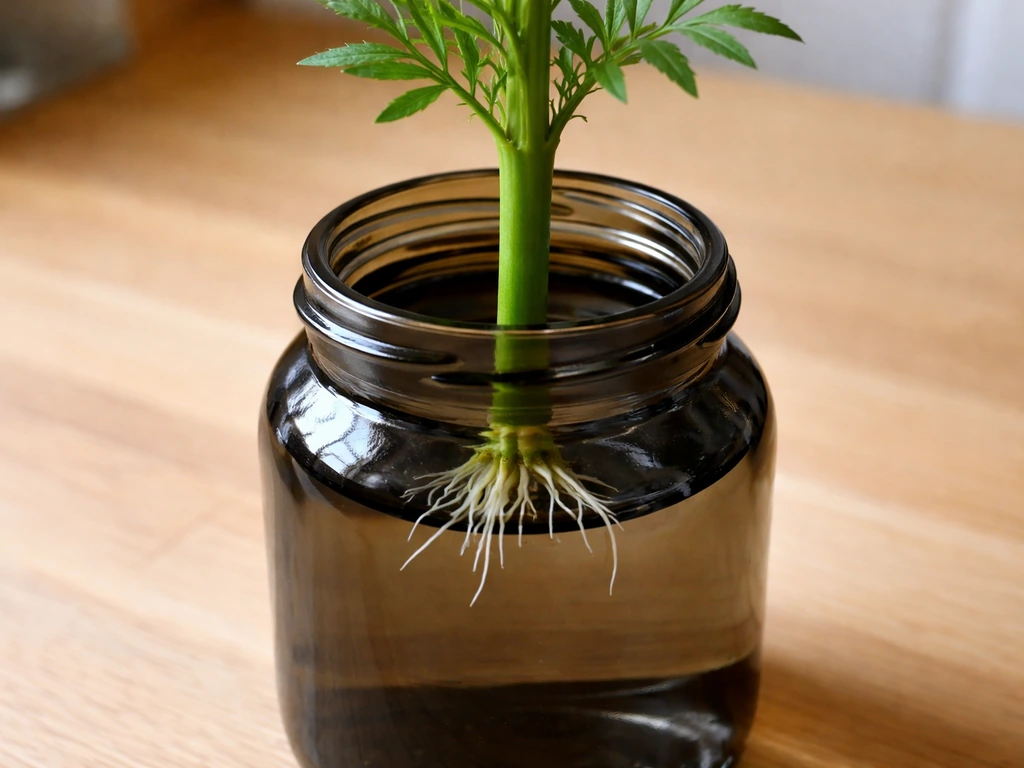
- Strip the lower leaves. Remove all leaves from the bottom 2 to 3 inches of the stem. Leaves left in the water will decompose, foul the water, and introduce pathogens that cause stem rot. Leave only a few leaves at the top of the cutting so it can still photosynthesize.
- Optional: pinch off any flower buds. If your cutting has buds, remove them. You want the plant's energy going into root development, not flowering.
- Place the cutting in your container. The bare stem should be submerged, with the lowest node sitting in the water. The leaves at the top should be well clear of the waterline. If the cutting is wobbly, prop it with the jar's neck or use a small piece of foil over the top with a hole poked through.
- Position in bright indirect light and a warm spot. Aim for 65 to 75 degrees Fahrenheit. Avoid direct harsh midday sun at this stage.
- Change the water every 5 to 7 days. Pour out the old water, rinse the container, refill with fresh room-temperature water, and return the cutting. Top up with fresh water between changes if the level drops below the stem.
- Monitor for root development. Small white root nubs typically appear within 7 to 14 days. Full roots of 1 to 2 inches, ready for transplant, usually develop within 2 to 3 weeks at the right temperature.
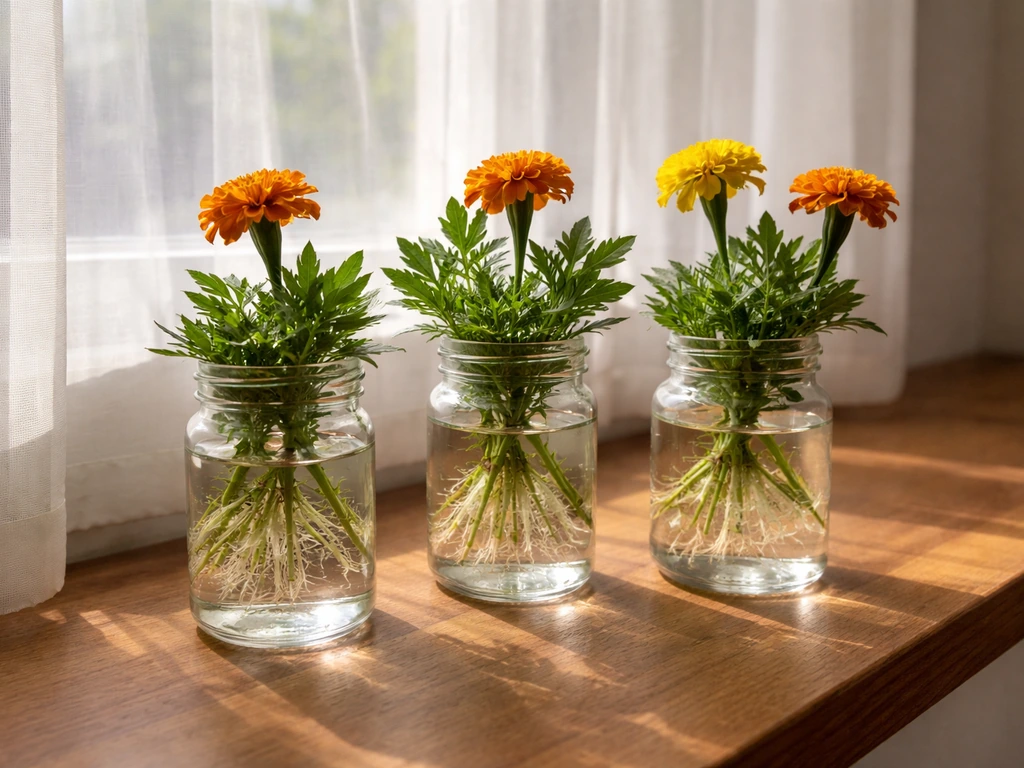
- Once roots are 1 to 2 inches long and have multiple branching rootlets, the cutting is ready to transplant to soil or move into a hydroponic nutrient solution.
Once your cutting has a good root system (1 to 2 inches long with visible branching), you have two paths: transplant to potting mix, or transition into a hydroponic nutrient solution. Both work. The choice depends on how much you want to manage and what your end goal is.
Transplanting to soil
This is the simpler path and the one most home gardeners should take. Fill a small pot (4 to 6 inch diameter) with a well-draining potting mix. Make a hole with your finger or a pencil, gently lower the rooted cutting in, and firm the soil around it. Water thoroughly right after transplanting to settle the soil and eliminate air pockets. Keep the newly transplanted cutting in bright indirect light for the first few days while it adjusts, then move it into full sun. Water when the top inch of soil feels dry. The plant will look a little wilted for the first day or two while it adapts from water roots to soil, but it should perk up within a week. For more guidance on growing from this stage onward, our article on how to grow a marigold covers everything from transplant through bloom. how to grow marigold seeds
Moving to a hydroponic setup
If you want to keep growing in water long-term, you need to switch from plain water to a balanced hydroponic nutrient solution. Plain water lacks the macro and micronutrients marigolds need to grow, so a plant kept in plain water after rooting will yellow and stall quickly. Use a purpose-made hydroponic nutrient concentrate mixed according to the product instructions. The key parameters to manage are pH and EC (electrical conductivity, which measures nutrient concentration). For marigolds, target a root-zone pH of 5.8 to 6.5 and check it daily at first with a pH meter or test kit, adjusting with pH Up or pH Down solutions as needed. pH outside this range blocks nutrient uptake even when nutrients are present in the water. EC will vary by product and growth stage, but a general starting point for flowering annuals is an EC of around 1.5 to 2.5 mS/cm. Top up the reservoir with fresh nutrient solution as the plant uses it, and do a full reservoir change every 1 to 2 weeks to prevent salt buildup and pathogen accumulation.
Nutrients, maintenance, and preventing rot and algae
The two most common problems with growing marigolds in water are rot and algae. Both are preventable with a few consistent habits.
Preventing rot
Rot is almost always caused by one of three things: leaves in the water, stagnant low-oxygen water, or too-low temperatures. Strip every leaf from the submerged portion of the stem before placing it in water. Change the water every 5 to 7 days without fail, and rinse the container each time. If you are running a hydroponic system, add an aquarium air pump and airstone to oxygenate the nutrient solution continuously. Dissolved oxygen at the roots is critical, and without it, anaerobic bacteria colonize the root zone and cause root decay. If you spot soft, brown, or slimy stem tissue, trim it back cleanly with a sterile blade, remove any dead material from the container, rinse everything, and start with fresh water.
Preventing algae
Algae needs two things to grow: light and nutrients. During the plain-water rooting stage, algae is mainly a nuisance rather than harmful, but it competes for oxygen in the water. Keep your container dark or opaque, and avoid placing it in direct intense light. In a hydroponic system with nutrient solution, algae control is more important because algae can clog roots and deplete oxygen. Use opaque reservoir containers, cover any openings, and replace the solution on schedule.
Nutrient management for hydroponic marigolds
Once your plant is in a hydroponic setup, nutrients need regular attention. pH and EC both drift over time as the plant absorbs minerals and as water evaporates. Check pH daily when you are starting out. Once you know how fast your setup drifts, you can settle into every-other-day checks. Keep pH between 5.8 and 6.5. EC should stay in the range appropriate for your nutrient product's vegetative or flowering formula. Top up with nutrient solution when the reservoir level drops, and do a complete reservoir flush and refill every 1 to 2 weeks to prevent salt accumulation. Marigolds are not particularly heavy feeders compared to fruiting crops, so start on the lower end of the recommended EC range and increase only if you see yellowing or slow growth.
Troubleshooting guide and expected timeline
What to expect week by week
| Week | What you should see | Action needed |
|---|
| Week 1 | Cutting looks fresh, maybe slight wilting; no visible roots yet | Change water at day 5 to 7, maintain temperature and indirect light |
| Week 2 | Small white root nubs appearing at the node; cutting perking up | Continue water changes, watch for any soft stem tissue |
| Week 3 | Roots 1 to 2 inches long with branching; new leaf growth possible | Ready to transplant to soil or move to nutrient solution |
| Week 4 onward | In soil: active growth and establishment; in hydro: continued vegetative growth | Regular watering or nutrient/pH management; full sun positioning |
Common problems and fixes
| Problem | Likely cause | Fix |
|---|
| Stem turning soft or slimy at the base | Leaves in water or stagnant low-oxygen water | Remove all submerged leaves, change water immediately, trim soft tissue with clean blade |
| No roots after 3 weeks | Too cold, wrong stem type, or damaged cut | Move to warmer spot (70+ degrees F), retake cutting just below a node, ensure cut is clean |
| Algae coating the container | Light reaching the water | Switch to opaque container or wrap jar in foil or paper |
| Yellowing leaves after transplant to water/hydro | Nutrient deficiency from plain water | Switch to hydroponic nutrient solution immediately, check pH is 5.8 to 6.5 |
| Leggy, pale new growth | Insufficient light | Move to brighter location or add grow light for 14 to 16 hours per day |
| Roots brown and mushy in hydro setup | Anaerobic conditions, no oxygenation | Add airstone and air pump, do full reservoir change, trim dead root tissue |
| Wilting after transplant to soil | Normal transplant shock from water roots adjusting | Keep in bright indirect light for 3 to 5 days, water well, do not over-fertilize |
| Plant grows well but will not flower | Day length issue (especially African marigolds) | Shorten photoperiod to 12 hours of light per day to trigger flowering in African types |
If you want more control over the process, a few upgrades make a real difference. An aquarium air pump with an airstone keeps dissolved oxygen high in both the rooting container and the hydroponic reservoir, which speeds rooting and prevents anaerobic rot. A basic pH meter (around $15 to $20) removes the guesswork from nutrient management and is worth having if you are serious about hydroponics. You can also experiment with taking multiple cuttings at once, since marigolds propagate readily and having three or four rooting simultaneously means you will always have at least one or two succeed even if a cutting fails. For those growing marigolds at home in winter or in cooler climates, our guides on [how to grow marigold in winter](/article/how-to-grow-marigold-in-winter) and how to grow marigold at home go deeper into indoor management and seasonal considerations that will apply directly once your water-rooted cutting is established.
The bottom line is that growing marigolds in water is practical and achievable today, as long as you work with cuttings rather than seeds, keep the water fresh and oxygenated, and transition to nutrients or soil once roots are established. The whole process from cutting to a transplantable, rooted plant takes about 2 to 3 weeks with minimal equipment. Start with one or two cuttings from a healthy plant, follow the steps above, and you will have rooted marigolds ready to go before the end of the month.